PCAP for ALP
Downloading Echo360 PCAP
This article helps you download Echo360 PCAP to your own computer and then start using it.
There are two ways you can access the installer for the software, but both routes lead to the same results.
To ease your navigation through these directions, I've numbered the major steps.
1. One way to access the PCAP download is to go to the Echo360 platform itself, which is https://echo360.org.
Login with your WPI credentials. You'll be routed to WPI's central authentication system.
Then skip to #3.
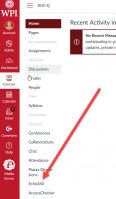
2. The second way to access the PCAP download is to enter the Echo360 platform through your Canvas site.
Click on the Echo360 button.
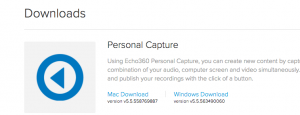
3. Once logged in, go to the settings gear on the top right. Clicking on the gear releases a drop down menu. Choose Downloads.
4. Download the installer for EchoSystem Personal Capture for whatever platform you're on, Windows or Mac.
Note: the Mac version of Personal Capture (aka PCAP) doesn't work for High Sierra. Choose Universal Capture instead.
Setting Up Echo360 PCAP
Open Echo360 Personal Capture.
Log In
Logging in is the step that establishes and connects your identity from the local instance of PCAP on your machine to the server from which your recordings will eventually be distributed.
Logging in will happen in a web browser that Echo360 will open once you click on Log In.
First you will enter your email, then you will login from WPI's central authentication system.

Settings
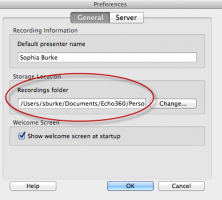
PCAP settings refer to the server connection and also the storage location of the recorded files.
On Windows, click on the gear in the upper right of the screen.
This little gear is where you check the server connection and change the storage location, if you want to.
I like to store them in a folder on my desktop.
On a Mac, go to File>Preferences to set your storage location for the recordings and also test your server connection.
Selecting Sources
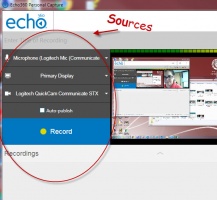
Sources refer to the audio visual inputs with which you will create your recording. To set the sources on a Windows installation, go to the home screen.
Make sure the sources on the left are selected. Microphone, primary display and camera are the sources selected in the above picture.
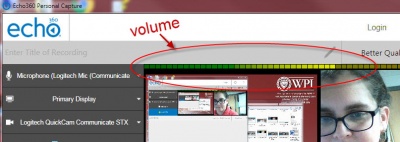
Below, you can see the volume meter is registering audio because it is illuminated by yellow squares. Yellow means it is loud but not distorted. Red means distorted. Green means audible, but soft. Students can always turn up or down their volume levels. But if the audio is distorted it may be inaudible, regardless of volume adjustments on the user end.
On a Mac, go to Start Recording and Configure. This is where you choose your sources.
Next Step: Capturing...
Now that you've got PCAP all set up, you can hit record.
More information on recording, editing and publishing to your course site can be found here.
If you have any questions, or any suggestions for this page, please email Sophie Jagannathan at sburke@wpi.edu.
Happy Capturing!

