OpenCV
From robotics
Contents
Who is this Tutorial For?
- This tutorial will help you install OpenCV on Python on a Windows system without having to compile libraries yourself.
What to Install
- OpenCV 3 or 2?
- OpenCV 3 is optimized for speed compared to 2. One important difference for students is that 3 does not natively include SURF or SIFT. You would need to compile OpenCV 3 yourself with those features which is outside the scope of this tutorial. OpenCV 3 does include ORB and other feature recognition algorithms.
- Python 3 or 2.7?
- If you are looking to install OpenCV 2 to use SURF and SIFT, use Python 2.7. If you are looking to install OpenCV 3, use Python 3. If you are working with a group, use whatever the group is using.
Installing Python
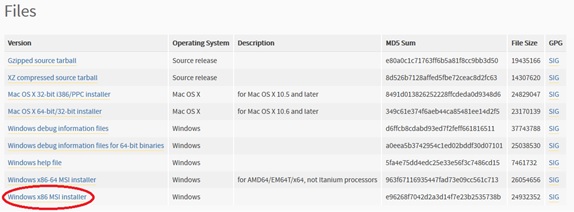
- Install Python 3.4.X or 2.7.X where the X is the most recent version. Download the 32-bit (x86) version. At the page shown in this link (https://www.python.org/downloads/), click on the “Download” link for your desired version. Scroll down until you see the files list and download/install the circled file.
- Add Python to Path
- If you have never added items to the Windows path, use the following tutorial. (http://windowsitpro.com/systems-management/how-can-i-add-new-folder-my-system-path)
- If using Python 3.4, add ;C:\Python34;C:\Python34\Scripts; to path
- If using Python 2.7, add ;C:\Python27;C:\Python27\Scripts; to path
Installing Other Necessary Libraries
- open cmd.exe
- Type “pip install six” without the quotes and press Enter
- Type “pip install python-dateutil” without the quotes and press Enter
- Type “pip install pyparsing” without the quotes and press Enter
Installing Other Necessary Packages
- NumPy
- Download the installer for your respective version of Python
- Run the downloaded file and wait for completion
- Matplotlib
- Download the installer for your respective version of Python
- Run the downloaded file and wait for completion
Installing OpenCV
- Download the .whl file for your respective version of Python from http://www.lfd.uci.edu/~gohlke/pythonlibs/#opencv.
- For Python 3.4, download “opencv_python-3.1.0-cp34-none-win32.whl”.
- For Python 2.7 with OpenCV 2, download “opencv_python-2.4.12-cp27-none-win32.whl”
- For Python 2.7 with OpenCV 3, download “opencv_python-3.1.0-cp27-none-win32.whl”
- in cmd.exe type:
- pip install [.whl file location here]
- such as "pip install C:\Users\Jeff\Desktop\opencv_python-3.0.0-cp34-none-win32.whl"
- Press “enter” and let OpenCV install
Testing
- Note that when loading images, if you specify a wrong name you won't get an error but you will get an error if you try to do something with that image (like display it). Make sure that the image you are trying to load is in the directory you are working in or you specify a full path.
- Example (put this in a Python script):
- import cv2
- img = cv2.imread('C:/Users/Jeff/Pictures/Camera Roll/Test_Image.jpg')
- cv2.imshow('image',img)
- cv2.waitKey(0)
- cv2.destroyAllWindows()
